Okay, so you’re convinced that creating your own Facebook group is the way to go. Now, where do you start?
Don’t worry, I’m here to break it all down for you, step-by-step.
Step 1: Identify Your Audience and Purpose:
Start by asking yourself two very important questions. The answers to these questions will help guide you through the rest of the process, so please don’t skip this step!
- Who’s Your Audience? Define the customers, fans, or individuals you want to reach. Are they existing customers, potential clients, or maybe a mix of both?
- What’s the Purpose? Identify what your community members will gain. Is it support, exclusive content, or a behind-the-scenes look at your brand? Having a clear purpose helps you tailor content and keep members engaged.
Step 2: Create Your Community
Now that you’ve defined your target audience and your purpose, it’s time to get into the nitty gritty and actually create your community.
- Navigate to the “Create Group” Link – First, log into your Facebook account. On your home page, look at the left-hand menu, find the ‘Groups’ tab, and click on it. A new page will appear, and here you’ll find the ‘Create Group’ button (usually located at the top right). Click on that!
- Choose a Name: Picking the right name is crucial. It should resonate with your brand and the community’s purpose. Think about what your members will search for and make it catchy but clear. If you’re having trouble, consider asking ChatGPT for help!
- Select Your Privacy Settings: Here’s where you decide who can find and see your group. You have two different options:
* Public: Anyone can see the group, its members, and their posts. Great for maximum visibility but consider privacy concerns.
* Private: Only members see who’s in the group and view posts. Best for exclusive or sensitive content.
When making your decision, consider what suits your audience and content best. You can always make a public group private, but you may have difficulty changing a private group to public, so keep that in mind.
Once you’ve completed this step, you’ll see an option to invite friends. I would recommend holding off on this until you’ve got the basics set up. We’ll cover invitations in just a minute.
- Design Your Community: Now that your group is created, it’s time to set everything up the way you want it. While it’s best to get things right from the start, don’t let the decision-making paralyze you. Just get the basics set up, and you can always go back and make updates later. To begin with, you’ll want to complete the following:
* Add Visuals: You’ll see a default cover image at the top of your new page. Click the “edit” button in the lower right corner, then choose “upload photo and select your image.
The ideal image size is 1640 x 856 pixels. I recommend using Canva to create an image that represents your brand or community theme.
Once you’ve uploaded the image, you can drag it to adjust how it fits. When it looks perfect, click ‘Save.’ Remember, this is your group’s visual calling card, so make it resonate!
* Write a Clear Description: This is the section where you can describe what the group is about, what members can expect, and why they should join.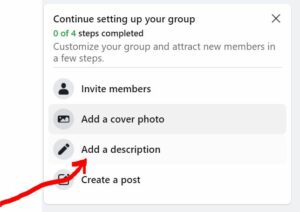 Do this by scrolling down to the “Continue setting up your group” box, then click the pencil next to “Add a description.”
Explain what members can expect, and why they should join. Make it inviting and aligned with your brand’s voice. When you’re done, don’t forget to save your changes!
* Set Up Your Group Rules: Outline basic behavior guidelines to ensure a positive environment. Use the rules section to clearly outline what’s allowed and what’s not. Be specific to avoid confusion later.
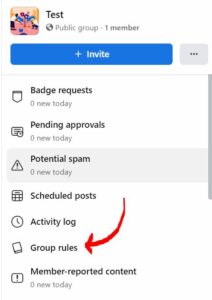
To set this up, look at the left-hand column and scroll down until you see the “group rules” tab. Click “get started” and add up to 10 rules to your group.
* Create and Pin a Welcome Post: Create a friendly welcome message, pin it to the top, and introduce new members to the community.
Once you’ve published your post, click the three dots on the top right of the post and select ‘Pin to Top.’ This keeps your welcome message always visible.* Complete Your Group Settings: Take your time to explore the additional settings, like post-approval requirements and member approvals.
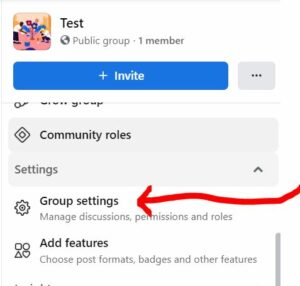
You can access this by going to the left-hand menu and scrolling down until you see the “group settings” link.Review each option and customize them to suit your needs.
That’s it! Your group now looks inviting and professional. It reflects your brand, sets clear expectations, and welcomes newcomers. Not only have you created a good-looking group, but you’ve also created a space where your members can feel like they belong.
Step 3: Invite Members
Now it’s time for the exciting part – start growing your community by inviting members! There are two primary ways to seed your group with new members (1) personal invitations and (2) promoting it on other channels. Let’s take a closer look at each.

Personal Invitations
The most obvious option is to get started by sending personal invitations to your current Facebook friends.
You can do this by going to the group’s home page and clicking the “invite” button under the cover photo. Then, you’ll have the option to send invitations using email addresses or invite your Facebook friends. If you click the Facebook friends option, you’ll also see an option to create a QR code that will direct people to your new group.
Once you’ve entered the information, click “send invites.” As people begin to accept, you’ll start to see some familiar faces in your group.
Promote on Other Channels
If you don’t want to limit your group to just your personal connections, consider promoting it on other platforms. Start by going to the group’s main page, then copying the URL from the search bar. Then, post the link on your Facebook business page with a compelling caption to invite followers to join.
You can also share the link on Twitter, LinkedIn, Instagram, or any platform where potential community members might see it. If you have an email list, don’t forget to include the link in a newsletter or a special invitation email.
One important word of caution – remember that quality often trumps quantity. Only invite those who will genuinely benefit from and contribute to the group. Keep the invites warm and personal, and don’t be shy about promoting your group across your networks. Your new community is going to be something special, and you want people to be part of it!
A successful Facebook community thrives on consistent engagement and a sense of belonging. Here’s how to keep your Facebook group lively, organized, and connected:
 Post Consistently
Sharing a consistent stream of content will help keep your group active and engaged. These important tips will make it easier:
- Create a Content Calendar: Plan your posts ahead of time. Mix in questions, tips, relevant articles, or exclusive offers. Keep the content varied and engaging.
- Use Post Scheduling Software: Tools like Buffer or Cloud Campaign allow you to schedule your posts in advance, ensuring consistency without eating up your day.
- Ideas for Posts: Share success stories, host live Q&A sessions, create weekly challenges or polls, highlight members’ achievements, or share behind-the-scenes of your business.
Moderate with Care
Remember, one of the great things about Facebook groups is that members can post in them as well. This can be excellent for engagement, but it’s important to keep a close eye on what people are saying. Here’s how to properly moderate your group:
-
- Set Up Post Approvals: If you prefer to review posts before they go live, you can enable post approval. Just go to ‘Group Settings’ and click ‘Post Approval’ to turn it on.
- Stay on Top of Comments: Monitor comments and jump in when needed. Encourage healthy discussions, but don’t hesitate to remove anything that violates your community rules.
- Assign Moderators (Optional): If the group grows large, you might want to consider assigning trusted members as moderators to help with managing the community.
Actively Engage with Your Members
-
- Set Aside Daily Engagement Time: Aim to spend at least 10 minutes a day interacting within the group. Respond to comments, ask follow-up questions, and show your presence.
- Celebrate Milestones Together: Hit a member milestone? Achieved something great as a community? Share and celebrate with your members!
Remember, your Facebook community is a living entity. Your consistent engagement, wise moderation, and genuine interest in your members make it a warm, inviting place. Treat it with care, foster its growth, and it will become a valuable asset to your brand.